
French Braid Quilt Pattern is one of those classic quilting designs that continues to inspire creativity among beginners and seasoned quilters alike. Its elegant, flowing layout mimics the gentle twist of a braid, making it both visually captivating and fun to create. Whether you’re exploring quilting as a hobby or crafting something special for your home, this pattern offers the perfect blend of beauty and simplicity.
As the name suggests, the French Braid Quilt Pattern draws inspiration from the hairstyle, with strips of fabric neatly “braided” together in a cascading sequence. What makes this technique so appealing is its adaptability — it works wonderfully with bold prints, solids, and even scraps, giving every project a unique personality. When done well, the design creates a sense of movement and depth, which is why so many quilters fall in love with it.
Using a French Braid Quilt Pattern doesn’t require advanced skills or complex cutting. In fact, many quilters find it surprisingly beginner-friendly once they get the hang of the layout. You don’t need special rulers or tools — just basic quilting supplies, a good eye for color coordination, and a little patience.
What Makes the French Braid Quilt Pattern Unique
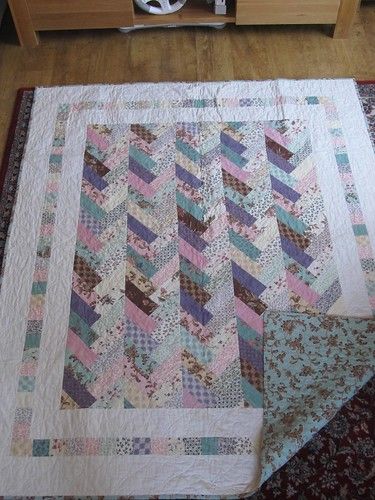
Unlike traditional block-based quilt patterns, the French Braid Quilt Pattern is built using long strips of fabric that are sewn together in a stepped diagonal sequence. This strip-piecing technique is what gives it its braided appearance and adds dynamic movement to the quilt.
The secret behind its beauty lies in the visual effect of light and dark fabrics arranged in alternating order. When planned thoughtfully, this contrast can guide the viewer’s eye along the “braid,” producing a sophisticated look. Some quilters prefer symmetrical braids with consistent color progressions, while others embrace the freedom of scrappy variations for a more eclectic vibe.
Moreover, the French Braid Quilt Pattern is incredibly versatile. It can be used for full-size bed quilts, runners, wall hangings, or even incorporated into other patterns as a border or focal point. This flexibility makes it a favorite for those looking to try something different without departing from traditional quilting principles.
Fabric Selection and Color Planning
Choosing the right fabric is crucial to achieving the desired effect with your French Braid Quilt Pattern. Many quilters like to use ombré color palettes that move gradually from dark to light or vice versa. This enhances the braid effect and gives the quilt a polished, professional look.
Start by selecting a central color theme, such as blues, earth tones, or pastels. From there, choose fabrics that fall within that range but vary in shade and pattern. Solids work well, but you can also mix in small prints for added texture. Make sure to balance bold patterns with more subtle ones to avoid visual overload.
When planning your layout, arrange the fabric strips on a flat surface before stitching. This allows you to see how the colors flow and make adjustments as needed. Some quilters like to photograph their layout for reference during sewing. Remember, contrast is key: the more difference between adjacent strips, the more pronounced the braid effect will be.
Tools and Techniques for a Perfect French Braid
You don’t need advanced tools to start quilting with the French Braid Quilt Pattern. A rotary cutter, self-healing mat, and quilting ruler are your best friends. Accurate cutting is essential because the entire design depends on clean, consistent strips.
Cut each strip to the same width — usually between 2.5 to 3 inches — and ensure the length accommodates the full braid. Many quilters sew their strips to a foundation, like lightweight interfacing, to keep everything aligned and stable. This step isn’t required, but it can be helpful for beginners or complex designs.
Chain piecing — sewing strips together without stopping between each — can speed up the process and keep your seams consistent. Take care to press your seams in one direction or open, depending on your preference. Pressing is critical for a smooth finish, especially when working with many layers of fabric.
Assembling and Finishing Your Quilt
Once your braid panels are completed, you can arrange them side by side or with sashing in between. The sashing adds space between the braids and helps each section stand out. You can use neutral colors for a clean look or choose a complementary color to add vibrancy.
Next, add borders to frame your design. Borders can be wide or narrow, plain or pieced — it all depends on the final look you want. After your quilt top is complete, it’s time to layer the quilt sandwich: backing, batting, and top. Baste with pins or spray adhesive to prevent shifting.
Quilting can be done by hand or machine. For the French Braid Quilt Pattern, straight-line quilting along the braid lines enhances the flow, while free-motion quilting can add texture and flair. Finish with a binding that complements your color scheme, and your quilt is ready to enjoy or gift.
Tips for Beginners Trying the French Braid Quilt Pattern
If you’re new to quilting or just trying the French Braid Quilt Pattern for the first time, here are a few helpful tips:
- Start with a table runner or wall hanging to practice the technique before tackling a full quilt.
- Use pre-cut fabric bundles (like jelly rolls) to save time and ensure coordinated fabrics.
- Take your time planning the layout — a well-thought-out color flow makes a huge difference.
- Don’t skip pressing between each step; it ensures a neat finish and accurate alignment.
- Be patient and enjoy the process — mistakes are part of the learning experience.
Creative Variations and Ideas
One of the joys of the French Braid Quilt Pattern is its adaptability. You can modify the traditional approach in many ways:
- Diagonal Layouts: Try angling your braid panels for a more dynamic design.
- Color Blocking: Use contrasting colors for each braid section to create a bold look.
- Accent Strips: Add narrow strips of metallic or high-contrast fabric between each braid strip.
- Appliqué: Include embroidered or appliquéd shapes over your braid to add depth.
- Mini Quilts: Create small braided squares and use them as blocks in a larger quilt.
These creative touches allow you to make the pattern your own and reflect your personality and style in your work.
FAQ About French Braid Quilt Pattern
Q: Is the French Braid Quilt Pattern suitable for beginners?
A: Yes! It’s a great pattern for quilters of all skill levels. Once you understand the layout, it’s repetitive and easy to sew.
Q: How many fabrics do I need for a French braid quilt?
A: It depends on the size and complexity of your project, but most designs use 5–10 different fabrics in coordinated shades.
Q: Do I need to use a foundation for sewing the braid?
A: Not necessarily, but using a foundation (like interfacing) can help keep your braid aligned, especially for beginners.
Q: Can I use scrap fabric for this pattern?
A: Absolutely! Scrappy versions of the French Braid Quilt Pattern are vibrant and full of character.
Q: What is the best strip size for a French braid quilt?
A: Most quilters use 2.5 to 3-inch strips, but you can adjust based on your desired look and scale.
Q: Should I press seams open or to the side?
A: Either works, but pressing seams open helps reduce bulk, which is useful when working with many layers.
Conclusion
The French Braid Quilt Pattern offers an elegant and flexible design that every quilter should try at least once. It’s easy to personalize with colors, layouts, and finishing touches that reflect your style and vision. From simple runners to full-sized masterpieces, this pattern never fails to impress.
We hope this guide has given you the confidence and inspiration to start your own braid-inspired quilt. If you’ve tried this pattern or plan to, please leave a sincere opinion and share your experiences in the comments. Suggestions for future topics or questions are always welcome. Happy quilting!